Step 1 – Select
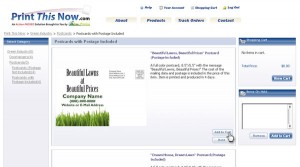
After you log in, you’ll be presented with the online storefront that displays all available documents. Once you find the product you want to order, you click the button beneath its picture that says “Add to Cart” to get started ordering and/or customizing your document.
Step 2 – Customize
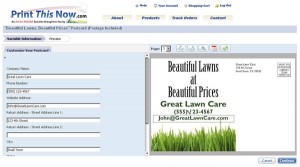
After you click the “Add to Cart” button, you’ll move to the customization screen. On the left panel, there are fill-in boxes for your contact information. If you don’t want a certain item on your document (e.g. you don’t have a cell phone number), just delete everything in that fill-in box and it will be removed from the document. Most templates are programmed to automatically fill in any gaps a removed item may cause. As you edit the fields, the preview picture on the right pane will update accordingly.
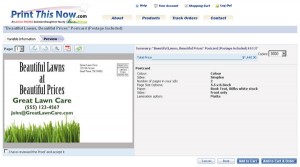
Once you’re satisfied, click the “Continue” button in the lower-right corner of the screen to move on to the preview. On the preview screen, you’ll want to check that all the information you entered is completely correct. Look carefully over all names, addresses, and phone numbers.
If you see a mistake you need to fix, it’s no problem. Just hit the “Back” button on the lower-right corner of the screen to return to the Customization. You can then fix the error and click “Continue” again return to the preview
screen.
If everything looks right, check the check-box in the lower left-corner of the screen that says “I have reviewed the proof and accept it. “ This says that you’re sure that everything is correct on your proof and it’s ready to print. The Printer Provider takes no responsibility for user submitted spelling errors and typos.
From here, you have two choices. If you have more documents to order and you’d like to keep shopping, click the button that says “Add to Cart”. This will send the document to your “shopping cart” (the icon on the top of the page) where it’ll wait for you until you’re ready. You’ll then return to the store front and you can select
Step 3 – Pay
When you’re all done, you’ll want to either click “Add to Cart and Checkout”, the “Shopping Cart” icon on the upper right corner of the screen, or the “View Cart” button on the home page. All of these will take you to your shopping cart page. The Shopping Cart page will show you all the documents you’re about to order.
By using the “Get Quote” button, you can see what your total will be without the shipping or tax. If you’d like to change it, you can adjust the quantities (number of items) using the drop-down list beside each item. If you adjust the quantities of your items after clicking “Get Quote” button you can click the “Get Quote” button again and it will update the price for the new quantities.
Once your ready to check-out, click the “Get a Quote” button. After you click the “Get a Quote” button, another button will appear just beneath it that says “Proceed to Checkout”. Click the “Proceed to Checkout” button.
The next screen you’ll see is the shipping details. Check that your shipping address information is correct and choose your shipping method from the drop-down list.
The next screen is the “Summary” screen which is an overview of all the relevant details about your order. Check one last time that all your information is correct.
After you’ve checked that box, click the button in the lower right corner that says “Place Your Order”. After you click this, it will take you to Authorize.net (a grey screen) where you can safely and securely enter your credit card information for the order.
After you enter your information at the Authorize.net page, click on the “Submit” button on the bottom of that page. It will return you to the Print Summary Screen with this message on the top of the screen: “Thank you for the order. Verify the status of your order in Track Jobs. For your convenience, it is recommended to print out this page.”
You can click on the blue “print” link to print out a receipt of the transaction for your records. You should also receive a confirmation e-mail about your order to the e-mail address associated with your account which you can define in your “Manage Account” tab. Your order is now complete.


